

by Ron K. Lussier
Mini-Tutorial #2
v0.5
This tutorial explains how to use a procedural cone to get flat disc effects for eye iris', planet rings and simple shockwaves.
The right object:
A primitive cone, with very little height, can do a few tricks by the nature of it's mapping.
The mapping coordinates generated by a cone are like tapered
cylindrical coordinates. If you have a cone with a height value of say 0.01, and then have
a smaller value for Radius1 setting than Radius2, the
cone sides become a disc, with virtually flat, circular mapping coordinates.
So..
The procedure:
1. Create a Cone like the one described above, turn on "Generate Mapping Coordinates"
Iris:
2. Assign a Multi-Material for the pupil/iris
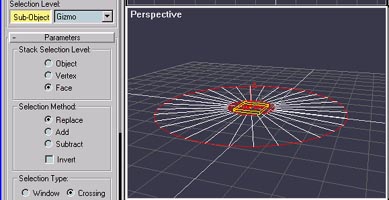
| Shockwave: 2. Add a Volume Select modifier and, in SubObject mode, from a top view of the cone, 2D-scale the Gizmo so it is inside both Radius 1 and Radius 2. 3. Switch to Face and Crossing 4. Add a DeleteMesh modifier, Animate the radii for the shockwave. |
 |
Mapping:
The iris:
A Cone has it's materials pre-defined as ID1=Top, ID2=bottom,
ID3=sides. A Multi-Material with ID1 as black and ID3 as the colored iris map will give
you near perfect iris mapping that will distort 'properly' when you change the pupil
diameter (Radius 1 of the Cone object).
Assign a Bitmap to the iris material. It would look something like this...
![]()
The Shockwave:
(TBD) For a shockwave effect you will want to animate both the Inner and Outer radii of
the Cylinder outward, and animate a Noise map, or similar effect, along the V coordinate
to achieve radial motion. The most effective way to do this is to move the Noise
"upward" so that it moves outward a bit slower than the overall motion of the
shockwave...
----------
All content ©1999
Burning Pixel Productions
All Rights Reserved - Do not redistribute
-
| Home
| Info
| 3ds Max
| Music
| Photography
| Vector Graphics
| Dancing Baby
|
| Graphics Gallery
| 3D Stereo Gallery
| Brazil Gallery
| QuotesBlog
|
![]()